Last week was Spring Break here in our part of the world. Which meant lots of bike riding, trampoline jumping and, of course, a trip or two to the library.
I happen to have a big kid who LOVES to read. Devours books. And? He needed a new book bag to transport all the book awesomeness to and from the library.
SO, off we went to the craft store {JoAnns this round} and picked up a messenger style bag in black. I thought about going the Bleachy Tee route, but the boy decided he wanted it in color, so we went more the craft paint route {more on that below}.
Then my boy drew a design he wanted on the bag. A robot. Or monster robot, as he called it.
{I love my 8 year old boy}
Then, we took the bag and I handed him my chalk pencil and let him just go with his design how he wanted it on the bag
{PS this is a GREAT big kid craft project, but for smaller littles, mama could transfer the design to the bag }
Then he chose the paint color(s) he wanted to use. He decided to let me to the painting part of things. I simply took some craft paint and textile medium {both bought at Hobby Lobby a while back} and mixed them together on a paper plate. Much like I do for Freezer Paper Stenciling.
Then, just a small paint brush {had it on hand, but got it at Hobby Lobby in a value pack of craft paint brushes} and painted away, going directly over the chalk. It took a couple coats since it was on black, but after about three it was the color he wanted, so we left it at that and let it dry.
A couple hours later, I went ahead and heat set it with the iron and pressing cloth {or scrap fabric piece is what I usually use } and VOILA!
Rockin' new book bag for my boy. :)
Showing posts with label crafting with kids. Show all posts
Monday, March 19, 2012
Monday, January 30, 2012
Football Style Bleachy Tee!
I've been up to it again. Yes, I have. I'm sure it's an addiction of sorts, but it's so dang easy and results are so instant gratification!
Bleachy Tee's! Football style:
It seriously works so great for my 8 year old boy. Once he passed 5&6, well, applique just wasn't "cool" any longer. This though? He LOVES them.
Bleachy Tee's! Football style:
{original post and tutorial can be found HERE}
It seriously works so great for my 8 year old boy. Once he passed 5&6, well, applique just wasn't "cool" any longer. This though? He LOVES them.
{photo courtesy of my fabulous FIL}
I'm sure more of these will be happening in the coming months as my son sky rockets out of every shirt that currently fits him! ;)
Thursday, December 9, 2010
Little Gnomes
I seem to go through thread pretty quickly while making lots of fun coffee cuffs...
In one particularly busy month, I got quite the collection of empty spools. I thought to myself there must be something I can make with these! Then, I happened upon a tutorial that, for the life of me, I cannot find now! If I do, I will certainly post it here...if these look familiar and you know where in blogland it is, feel free to share in the comments so credit can be properly given.
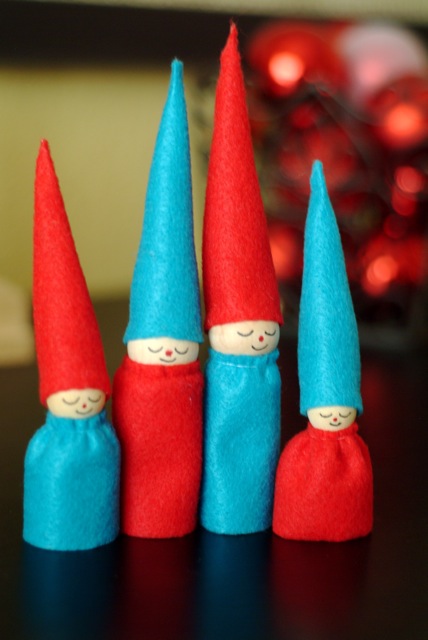
Meanwhile...empty spools. And gnomes. Serious fun and cuteness when adding a bit of felt, wooden head-dealy's and a marker.
See!
I took my empty spool, glued the heady-ball dealy on (yes, I just called it that...let's just go with it):
Then I took some felt and glued together some cute little clothes and hat for them. Then took a marker and added a face...and voila!
Cute little gnome family. They make me happy.
And yes, that littlest one IS meant to be Songbird. :)
In one particularly busy month, I got quite the collection of empty spools. I thought to myself there must be something I can make with these! Then, I happened upon a tutorial that, for the life of me, I cannot find now! If I do, I will certainly post it here...if these look familiar and you know where in blogland it is, feel free to share in the comments so credit can be properly given.
Meanwhile...empty spools. And gnomes. Serious fun and cuteness when adding a bit of felt, wooden head-dealy's and a marker.
See!
I took my empty spool, glued the heady-ball dealy on (yes, I just called it that...let's just go with it):
Then I took some felt and glued together some cute little clothes and hat for them. Then took a marker and added a face...and voila!
Cute little gnome family. They make me happy.
And yes, that littlest one IS meant to be Songbird. :)
Thursday, April 29, 2010
Bleachy Tees!
I have a new obsession. Well, it might not be new, but it sure is fun! And it's been a good distraction from all the adoption craziness going on here lately....
So, what is this new obsession? Well, it's making t-shirt designs with a bleach pen on some plain jane tees! Sound fun?
Here is how I go about it:
Take a plain tshirt (or a print one, whatever you like really)
Get your bleach pen
Like so:

I used a tshirt form from Hobby Lobby I got a while back. You could also just put freezer paper on the other side of the shirt to prevent any bleeding from the bleach pen. Make sure you don't draw the design bigger than the paper or form or you will have some bleach action on the back of the shirt too!
Now, here is where you can do one of two things: you can trace the design you want with chalk first and then trace over that with the bleach pen. OR, you can just freehand it. I did both ways and for some reason the chalk one turned out more blotchy. Not sure why, maybe I will test it out again to see if maybe it was just a fluke. However, do what works best for you. :)

Monster Surfing

Fun Robot
Then, I let it sit for approx. an hour on the shirt. Basically make sure the color is actually changing on the shirt where the bleach pen is. Then, pop it in the wash and then dry and VOILA!

Fun new and super personalized t-shirt!!!
Now, I just need to stop finding tshirts to do this to. Before I know it all my son's t-shirts will be bleachy designed!
So, what is this new obsession? Well, it's making t-shirt designs with a bleach pen on some plain jane tees! Sound fun?
Here is how I go about it:
Take a plain tshirt (or a print one, whatever you like really)
Get your bleach pen
Like so:

I used a tshirt form from Hobby Lobby I got a while back. You could also just put freezer paper on the other side of the shirt to prevent any bleeding from the bleach pen. Make sure you don't draw the design bigger than the paper or form or you will have some bleach action on the back of the shirt too!
Now, here is where you can do one of two things: you can trace the design you want with chalk first and then trace over that with the bleach pen. OR, you can just freehand it. I did both ways and for some reason the chalk one turned out more blotchy. Not sure why, maybe I will test it out again to see if maybe it was just a fluke. However, do what works best for you. :)

Monster Surfing

Fun Robot
Then, I let it sit for approx. an hour on the shirt. Basically make sure the color is actually changing on the shirt where the bleach pen is. Then, pop it in the wash and then dry and VOILA!

Fun new and super personalized t-shirt!!!
Now, I just need to stop finding tshirts to do this to. Before I know it all my son's t-shirts will be bleachy designed!
Thursday, July 23, 2009
Sharks!!!
Bet you can't guess what I've been up to again!

What?! Freezer Paper Stenciling? How did you ever guess?!

It can't be that I am totally addicted to it, can it? Well, I am. It's just so simple and fun! Especially when my son asks me to draw things like a Hammerhead Shark. He's always keeping me on my toes in challenging ways. Seriously, for whatever reason it seemed difficult to draw this one!

But, I like how it turned out. Even if I couldn't get a decent picture of it. Could be the model was hardly holding still and just wanted to go play in his new mamamade shirt.
And tomorrow, he turns six years old. I am so not ready...

What?! Freezer Paper Stenciling? How did you ever guess?!

It can't be that I am totally addicted to it, can it? Well, I am. It's just so simple and fun! Especially when my son asks me to draw things like a Hammerhead Shark. He's always keeping me on my toes in challenging ways. Seriously, for whatever reason it seemed difficult to draw this one!

But, I like how it turned out. Even if I couldn't get a decent picture of it. Could be the model was hardly holding still and just wanted to go play in his new mamamade shirt.
And tomorrow, he turns six years old. I am so not ready...
Tuesday, July 21, 2009
TV Timeout Fun!
Last week I decided we needed a little "TV timeout". Sometimes I wish we didn't have a TV at all. Just such a time-sucker at times! Especially during the Summer. Lately it's just been too stinkin' hot to do much outside at all. Even swimming in the afternoon feels more like someone put us in the oven to cook than a cool and relaxing time. Ick.
So, since we had watched just a smidge bit too much TV the previous week and it started becoming a battle to turn off more than a treat for my child, I decided the following Monday was our first official TV Timeout day.
AND, it was awesome!!!
We planned a little ahead and went to the craft store together to pick out some fun projects to do. For this particular day, the boy chose these:

We brought them home and almost immediately opened the packages and dumped out the sticks. I forgot how much fun and simple these things could be! We sat there at the table for over an hour just building and playing. Using our imaginations.

It was so much fun.
Then we read a bunch of books and the time seemed to fly by until dinner time. Mmm, love days like that.
It apparently was such a hit, he requested we do it again the next day! So, we did.
So, since we had watched just a smidge bit too much TV the previous week and it started becoming a battle to turn off more than a treat for my child, I decided the following Monday was our first official TV Timeout day.
AND, it was awesome!!!
We planned a little ahead and went to the craft store together to pick out some fun projects to do. For this particular day, the boy chose these:

We brought them home and almost immediately opened the packages and dumped out the sticks. I forgot how much fun and simple these things could be! We sat there at the table for over an hour just building and playing. Using our imaginations.

It was so much fun.
Then we read a bunch of books and the time seemed to fly by until dinner time. Mmm, love days like that.
It apparently was such a hit, he requested we do it again the next day! So, we did.
Thursday, May 28, 2009
Thursday's With Mely
Every once in a while, we try to have a crafty day of some sort together, my niece and I. Unfortunately, last week we had to cancel last minute, but she ended up coming over on Saturday instead. My boy and hubby went to a birthday party for a fellow classmate of my boy's and Mely and I hung out and did some sewing.
We were making dolls for Craft Hope. If you haven't, you must check it out. Very cool.
While I was drafting a pattern (inspired by my niece's very own "squishy baby"), she drew this picture for me:

To translate the kindergarten hand writing (which I love oh so much!), it says (as she read it to me):
One day I went to my auntie Jaime's house. I made a doll. It was fun. I helped her. She loves me.
One thing I must say I thought was super adorable, is that she added "dashes" to her doll drawing like I was for the seam allowance on my drawings. Eek! I love it.

Oh how sweet this girly is! And she is right, her Auntie does love her very much.
The dolls are heading out this week and next week I will get some pics posted of them. Fun, fun.
We were making dolls for Craft Hope. If you haven't, you must check it out. Very cool.
While I was drafting a pattern (inspired by my niece's very own "squishy baby"), she drew this picture for me:

To translate the kindergarten hand writing (which I love oh so much!), it says (as she read it to me):
One day I went to my auntie Jaime's house. I made a doll. It was fun. I helped her. She loves me.
One thing I must say I thought was super adorable, is that she added "dashes" to her doll drawing like I was for the seam allowance on my drawings. Eek! I love it.

Oh how sweet this girly is! And she is right, her Auntie does love her very much.
The dolls are heading out this week and next week I will get some pics posted of them. Fun, fun.
Labels:
craft hope,
crafting with kids,
dolls,
thursdays with mely
Subscribe to:
Posts (Atom)